The single most-asked question from architects on r/FluxAI right now is some version of the same thing. “I have a Rhino model. I have ComfyUI installed. How do I get from one to the other without losing my building.” The replies almost always link to a YouTube tutorial that begins with a clean square image and ends with a stylized version of that image. The Rhino-specific steps are the ones that never get written down, and the Rhino-specific steps are the ones where the workflow either holds or collapses. This is the version that holds.
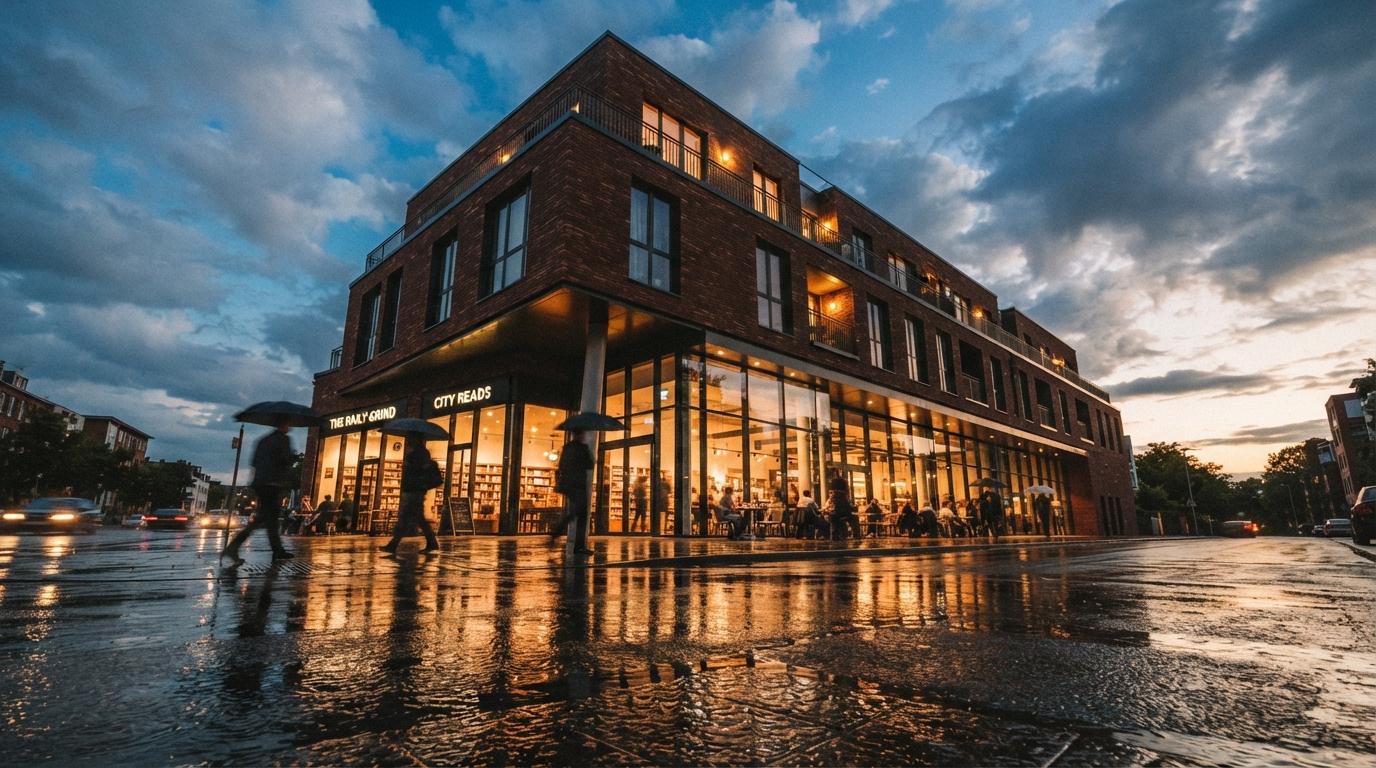
We took a 14,000-square-foot mixed-use project, three retail bays at grade and twelve apartments above, modeled in Rhino 8 with VisualARQ for the unit layouts. The brief was four exterior hero shots for a permit-cycle community engagement deck, due in five days, in the studio's house style, which is moody, restrained, and lightly photographic. The shots had to be recognizable as the building we drew. The ComfyUI side of the workflow had to honor the massing. The Reddit-popular workflows do not. This one does.
The export from Rhino, and why most architects get this wrong
The ComfyUI workflow does not start in ComfyUI. It starts in Rhino with the right export. If your depth map is wrong, your ControlNet will lie about the building, and the output image will be a beautiful render of a different building. We export three image passes from Rhino, all from the same camera, at 2048 pixels on the long side, with the model in shaded display mode and the linework turned off.
Pass 1. The depth map
Rhino's built-in display mode for depth is workable but not ideal. We use the free Lands Design display mode or a custom display mode with edges hidden, color set to a black-to-white linear ramp by Z distance from camera, and no shadows. The result is a clean grayscale where near objects are dark and far objects are pale. This is the file that goes into the ControlNet Depth node in ComfyUI. If this pass is wrong, nothing else can recover it.
Pass 2. The line drawing
The second export is a Make2D or a viewport capture with technical display mode and edges on. This is the input for the ControlNet Lineart or Canny node. The lineart pass keeps the diffusion model honest about window mullions, balcony railings, and parapet conditions. Without it, the model will smooth those details out of existence.
Pass 3. The flat shaded view
The third export is a flat-shaded viewport capture with the materials assigned but the lighting bland. This goes into the IP-Adapter or the img2img node as a style reference for the materials. The diffusion model uses it to understand which surface is glass, which is brick, and which is concrete. This is the pass that most Reddit workflows skip, and it is the pass that fixes the “all my buildings look like the same building” problem.
The ComfyUI graph, node by node
The graph is twelve nodes. We will name each one and explain what it does, because the YouTube tutorials always show the graph and never explain why each connection exists. The connections matter more than the nodes.
- Load Checkpoint. Flux dev or Flux schnell are both viable. Flux dev gives slightly better material accuracy. Flux schnell gives faster iterations. We default to Flux dev for hero shots and Flux schnell for the conceptual passes.
- Load Image (Depth Pass). This is your depth-pass export from Rhino.
- Load Image (Line Pass). Your Make2D or technical display export.
- Load Image (Flat Shaded). Your flat shaded viewport export.
- ControlNet Depth. Weight 0.85, end percent 0.7. This is the structural anchor. Higher weight, more loyalty to your massing.
- ControlNet Lineart. Weight 0.55, end percent 0.6. This keeps the architecture honest about its lines without over-defining them.
- IP-Adapter (Flat Shaded reference). Weight 0.4. Material guidance, soft enough that the model still has room to add weathering and atmosphere.
- Positive prompt. Specific architectural language. “Three-story mixed-use building, exposed brick base, dark steel canopy, warm interior glow, late afternoon light, restrained mood, light overcast, photographic.”
- Negative prompt. “Extra windows, distorted geometry, melting facade, blurred details, oversaturated, fisheye, illustration, painting.”
- KSampler. Steps 28, CFG 4.5, sampler dpmpp_2m, scheduler karras. This is the configuration that survived two weeks of testing.
- VAE Decode. Standard.
- Save Image. Two outputs, one at full resolution and one downsampled for the client deck.
The numbers above are not theoretical. They are the configuration that produced four hero shots for the community engagement deck without a single image that misrepresented the geometry. The Depth ControlNet weight is the most important variable. Too high and the image looks like a re-skinned diagram. Too low and the model invents a different building.
The tool-card grading
Rhino as the source
The depth-pass export from Rhino is cleaner than any other CAD tool we tested for ComfyUI input. NURBS surfaces produce smooth depth gradients without the polygonal artifacts that SketchUp's depth export introduces. Lines export cleanly from Make2D. Materials from the rendered display mode survive the trip to IP-Adapter.
ComfyUI plus Flux as the engine
The free side of the AI rendering stack. The learning curve is real but the ceiling is high. Once the graph is built and saved, the next project is a file swap. Two weeks of investment, lifetime of pipeline ownership. Cloud variants like RunComfy or ThinkDiffusion are credible alternatives for studios without local GPUs.
The grading table, what each variable changes
| Variable | Low value effect | High value effect | Sweet spot |
|---|---|---|---|
| Depth ControlNet weight | Model invents building | Output looks diagrammatic | 0.80–0.90 |
| Lineart ControlNet weight | Mullions and railings vanish | Image becomes a colored line drawing | 0.50–0.60 |
| IP-Adapter weight | Materials drift to model defaults | Output mimics flat-shaded source too literally | 0.35–0.45 |
| KSampler steps | Underbaked image | Diminishing returns past 32 | 26–30 |
| CFG scale | Loose interpretation | Over-defined, plastic look | 4.0–5.0 |
The three problems most Rhino-to-ComfyUI workflows hit
The depth pass is too steep. If your depth gradient compresses everything into the same value range, the ControlNet cannot tell foreground from background and the model invents depth. Solution: in Rhino, set the depth clipping to a bounded range around the building, not from camera to infinity. The depth pass should use the full grayscale range.
The lineart pass is too dense. A Make2D with every Rhino edge turned on gives the lineart ControlNet too much to work with, and the output ends up looking like a colored elevation drawing rather than an image. Solution: hide construction lines, isocurves, and hidden edges before exporting Make2D. Only the visible architectural lines should make the trip.
The flat shaded pass is doing too much work. If the IP-Adapter weight is high enough to drive the materials, it is also high enough to flatten the lighting. Solution: lower the IP-Adapter weight to about 0.4 and let the diffusion model handle the lighting from the prompt. Materials should come through. Lighting should not.
The Rhino-to-ComfyUI workflow is not a magic trick. It is a careful set of three exports and a graph that respects them. The Reddit threads stall because the exports never get explained. The graph is downstream of the exports.
Why the Rhino-specific version matters
SketchUp users have a half-dozen plugins that automate the depth and lineart export. Revit users have Enscape and Veras inside the modeling tool. Rhino users have neither. The Rhino-to-ComfyUI workflow has to be assembled by hand, and the assembly is the part nobody documents because the people who figured it out moved on to using it and never wrote it down. This is the writeup that should have existed a year ago.
Once the workflow exists, the iteration speed is the part that surprises every architect we have walked through it. The first hero shot takes an afternoon. The next nine hero shots take an afternoon combined. Save the graph. Reuse it on the next project. Change three nodes, the camera, and the prompt. The pipeline is the asset.
Our take, which Rhino practices should invest in this
If your practice is producing concept renders in volume, especially for permit-cycle community engagement, marketing site teasers, or schematic design presentations, the ComfyUI-plus-Rhino workflow is the highest-leverage AI investment your studio can make this quarter. It is free. It is local. The output is yours. Once built, the per-image cost is zero, and the per-image time is measured in minutes once you stop fiddling with the parameters.
If your practice is producing final-quality construction-document graphics or photoreal marketing imagery for printed brochures, this is not the workflow. The output is concept-grade. Beautiful, sometimes more beautiful than a path-traced render, but still concept-grade. Pair it with a downstream V-Ray or Enscape pipeline for the deliverables that require physical accuracy.
The deeper point is that the architects on Reddit asking for this workflow are right to ask. The pipeline exists. The pieces are public. The reason the threads stall at the depth map is that nobody has bothered to write down the Rhino-specific export steps. We have. Save the graph, save the export instructions, and run it on next week's project. The first one is a learning curve. The second one is a tool.
Try it this week. Take one current Rhino project, export the three passes described above, and run them through any ComfyUI graph you already have. The deltas between this graph and whichever generic one you were running are where the building stops being a different building. The pipeline starts to feel like a tool the day the second project takes an hour instead of an afternoon.
Tested by Vista Studios on a 14,000-square-foot mixed-use project. Rhino 8 with VisualARQ, ComfyUI local install, Flux dev checkpoint, ControlNet Depth and Lineart, IP-Adapter for material reference. No affiliate relationships.