There is a tutorial that keeps recirculating in the architecture corners of YouTube and Reddit this year, and the title is always some version of the same promise: turn your 2D floor plan into a photorealistic 3D render — auto-coloured, textured, lit, upscaled to 4K — with AI. The demos are gorgeous. They are also, almost without exception, cherry-picked, and they skip the one step that decides whether the output is a usable drawing or a confident hallucination.
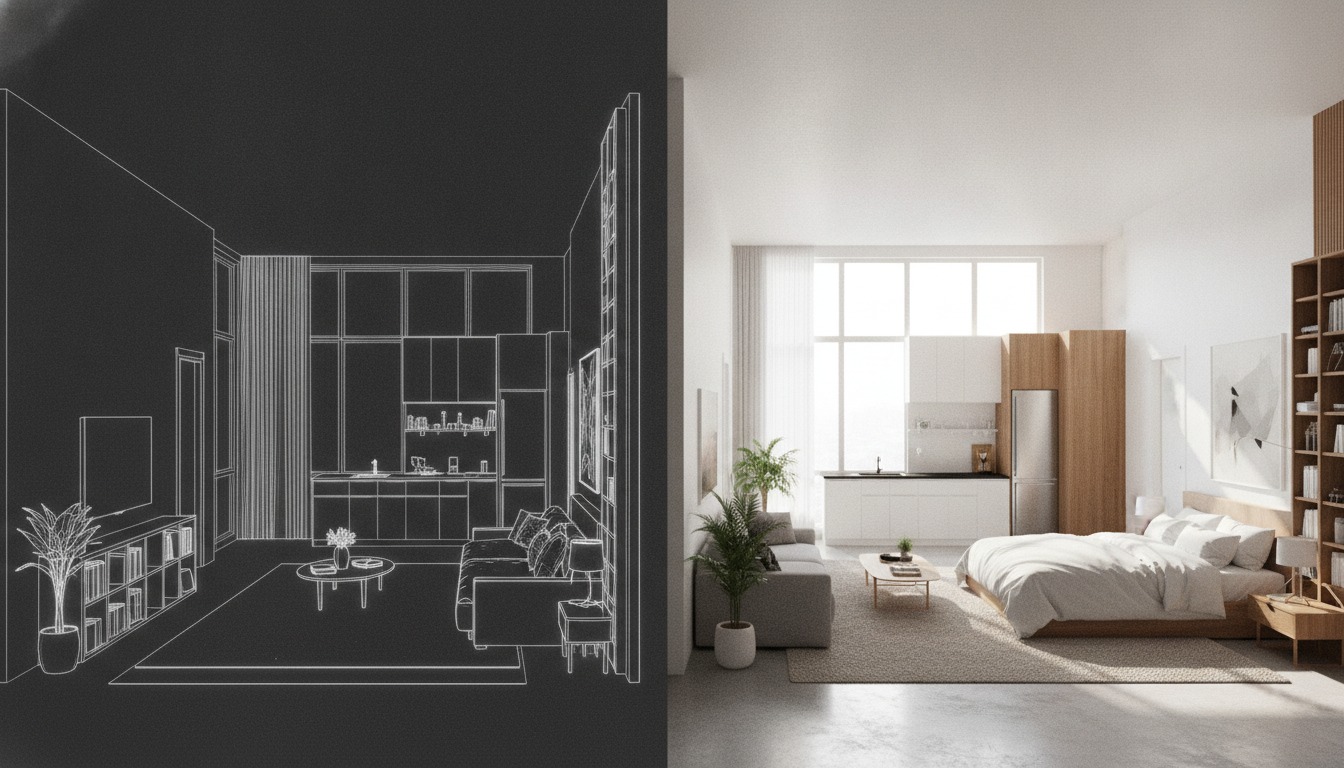
So we built the workflow ourselves, in ComfyUI, on a real one-bedroom apartment plan from a live fit-out job — not a stock plan chosen because it renders well. The question was the practical one: can you actually hand a flat plan to a diffusion model and get back something that respects where you put the walls? The short answer is yes, with one large asterisk. The long answer is the graph below, and the node where most people quietly lose their geometry.
All of this runs locally and costs nothing but a GPU and an afternoon. We ran on a 12 GB card; Flux is heavy but workable with the fp8 weights. SDXL with the architectural ControlNets is the lighter-weight alternative and most of this transfers to it directly.
What "2D plan to 3D" actually means
The phrase hides two completely different jobs, and the demos blur them on purpose because one is reliable and one is hard.
Job one: the rendered plan. Take the orthographic plan and dress it — colour the rooms, drop in furniture and flooring textures, add soft shadows, make it a presentation drawing instead of a CAD export. This is genuinely reliable. You are still looking straight down (or at a gentle axonometric), so the model never has to guess at the third dimension. ControlNet holds your walls, the diffusion model paints inside them, and the output is a coloured, furnished plan you could put in front of a client tomorrow.
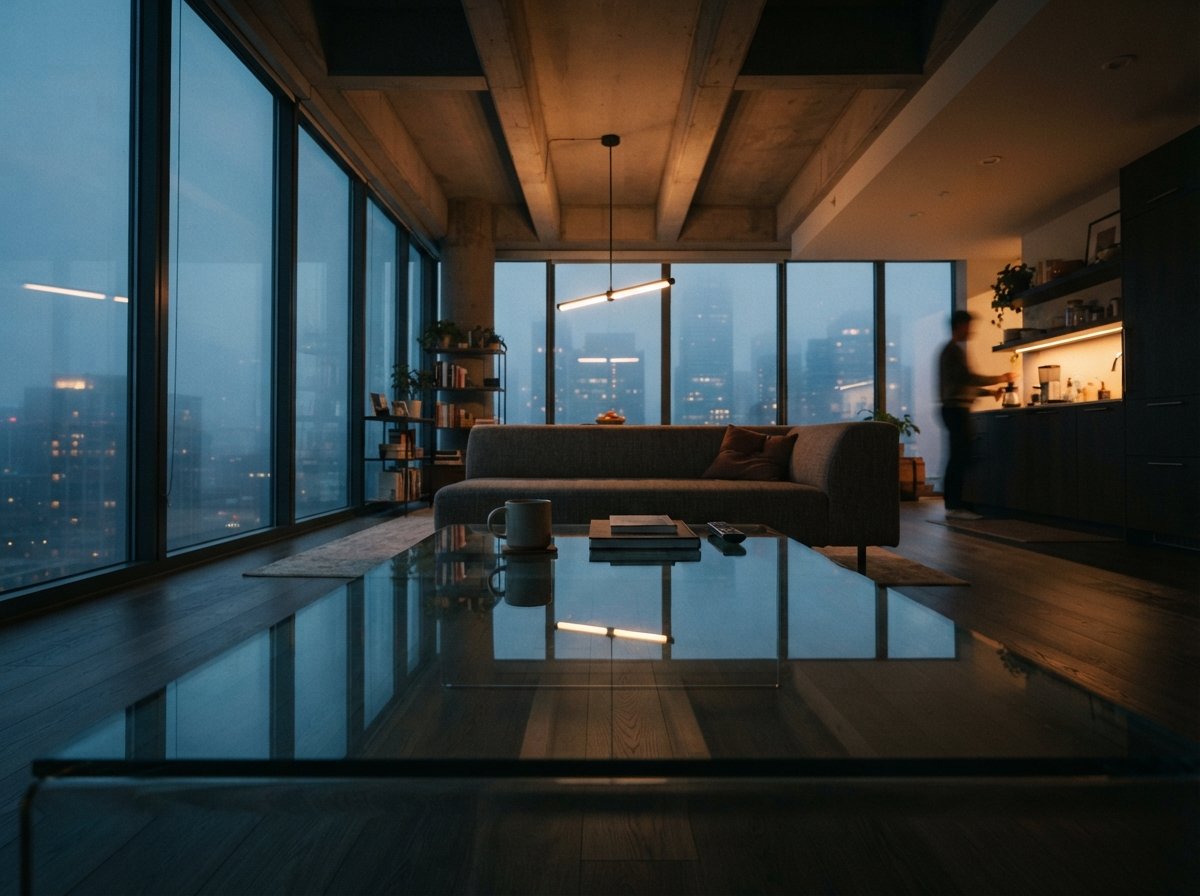
Job two: the true perspective. Take the same flat plan and produce an eye-level interior or a dollhouse 3D view. This is where the seductive demos live and where the honesty usually stops. A flat plan contains no depth information. There is nothing in a top-down line drawing that tells a model how tall the walls are, where the ceiling sits, or how the window heads line up. Ask for a perspective off a flat plan and the model will happily invent all of it — and it will invent differently every seed.
The graph, node by node
ControlNet — the part that holds your walls
Load the plan as an image, run it through a preprocessor, and feed it to an Apply ControlNet node. The preprocessor choice matters more than anything else in the graph. For architectural line work, MLSD is the one to reach for — it detects straight line segments and is purpose-built for the kind of clean orthogonal geometry a plan is made of. LineArt is the fallback for plans with curves and annotation you want preserved; Canny is the blunt instrument that also traces every dimension string and door swing you forgot to hide.
Clean your plan before it ever touches ComfyUI. Strip dimensions, text, hatching and title-block clutter in CAD first. The model treats every line as a real edge, so a leader line pointing at a radiator becomes, with depressing reliability, a radiator-shaped object floating in the room.
The depth pass — the step the demos skip
This is the asterisk. If you want a trustworthy perspective rather than a coloured plan, you have to give the model depth, and a flat plan cannot. The fix is unglamorous and takes five minutes: extrude the plan into rough massing in SketchUp or Blender — walls up to ceiling height, no detail — set a camera, and export both a viewport line image and a depth map. Now you feed Depth Anything V2 (or Zoe) as a second ControlNet alongside the line control, and the model finally has a third dimension to respect instead of fabricate.
Yes, this means the "2D plan to 3D, no modelling" pitch is a half-truth. The five-minute extrude is the difference between a render that matches your building and a beautiful image of a building that does not exist. We would rather tell you that than sell you the demo.
The render and the 4K upscale
With the controls wired in, the KSampler does the work. Two levers decide the outcome: denoise and ControlNet strength. Run img2img off your plan at a denoise around 0.45–0.55 and the output stays close but can look flat; push past 0.7 and it turns beautiful and starts drifting from your layout. ControlNet strength is the counterweight — keep MLSD up around 0.8–1.0 and you can afford a higher denoise without the walls wandering. Prompt for the materials and light you actually want ("warm oak floor, matte white walls, north light, soft contact shadows"), not for "photorealistic 8k masterpiece," which buys you nothing but contrast.
The "4K" everyone advertises is just a tiled upscale on the back end. Ultimate SD Upscale splits the image into tiles, re-renders each at higher resolution with a low denoise, and stitches them back. It is what turns a sharp 1024px render into a 4096px deliverable without melting the detail. It is also the slowest node in the graph — budget for it.
| Outcome | Rendered plan (top-down / axo) | True perspective view |
|---|---|---|
| Control inputs needed | MLSD / LineArt from the plan | Line + depth from a rough 3D extrude |
| Modelling required | None | ~5 min massing extrude |
| Geometry reliability | High — walls hold | Good with depth, poor without |
| Risk of invented detail | Low | High if depth is skipped |
| Best use | Coloured presentation plans, furnished layouts | Concept interiors, marketing dollhouse views |
Where it quietly invents a wall
Scale drift. Diffusion models have no sense of metric scale. A doorway will render at a believable height in one room and slightly off in the next, because the model is matching look, not dimension. For a presentation image this is invisible; for anything a contractor might read off, it is a trap.
Symmetry and repetition collapse. A row of identical windows or a run of repeated structural bays is where the model gets bored and starts improvising — one window wider, one mullion missing. The tighter your ControlNet, the less this happens, but it never fully goes away on a busy facade.
The flat-plan perspective. Worth repeating because it is the single most common failure: a perspective generated from a plan with no depth control is fiction. It will look spectacular and it will not be your building. If a client could mistake it for a measured view, you are one step from a very awkward meeting.
ComfyUI does not read your plan the way you do. It sees a field of edges and fills it with the most plausible image — and "plausible" and "correct" only overlap when you force them to with control inputs.
Who this workflow is actually for
Anyone who needs coloured, furnished presentation plans fast. This is the strongest, most reliable use, and it is genuinely a time-saver over hand-rendering a plan in Photoshop. Residential architects and interior designers will get the most mileage here.
Concept-stage teams who can spare a five-minute extrude. Once you accept the depth pass, the perspective workflow is a fast, cheap way to test material and light directions before committing render time in a heavyweight engine.
It is not for anyone hoping to delete modelling from their process, and it is not a documentation tool. Nothing it produces is dimensionally trustworthy. Treat the output as a picture, never as a drawing.
We build the graph, then tell you where it breaks.
The ArchiGen AI journal runs the workflows architects are actually being sold — node by node, on real projects — and reports the step the tutorial skipped. No affiliate links, no sponsored placements.
Read the journal →Our take
The "2D floor plan to photoreal 3D" workflow is real, useful, and oversold in roughly equal measure. Split into its two jobs, the verdict is clear: as a way to turn a flat plan into a coloured, furnished, beautifully lit presentation plan, ComfyUI is excellent and the geometry holds. As a one-click route from flat plan to trustworthy perspective, it does not exist — and the tutorials that imply it does are quietly leaning on a 3D model they did not mention.
Build the graph once, clean your plans before they go in, and never skip the depth pass when you need a perspective. Do that and ComfyUI earns a permanent slot in the presentation toolkit. Believe the demo at face value and you will ship a gorgeous render of a building nobody designed. The tool is honest about what it is the moment you stop asking it to be magic.
Built by Vista Studios in ComfyUI on a live one-bed apartment plan. Outputs treated as presentation imagery, not measured drawings. No affiliate relationship with any model or node author.